
Introduction
- Are you considering adding a garage to your home?
- Are you wondering which type of garage is right for your specific needs?
- Do you need to find out how much metal garages cost in your area?
- Do you want a quick and easy guide to buying a garage?
If you answered “yes” to any of those questions, this guide is for you.
I’m Alan Bernau Jr., owner of Alan’s Factory Outlet. I’ve helped more than 75,000 homeowners customize and install carports, metal garages, and similar metal buildings. That experience has helped me understand what questions homeowners like you have about metal garages.
I created this guide to help you get the answers you need to make the right decision for your situation.
In this guide you will learn:
- The pros and cons of metal garages.
- How you can know if a metal garage is right for you.
- How to calculate what size of garage you need.
- How much your garage will cost.
- How to quickly get information about regulations and permits.
- How to design your garage and get it installed.
Over the past several years, the demand for metal garages has continued to grow rapidly. If you want to save time and money on your garage, you should read this guide now, before prices go up.
If you happen to have any questions that aren’t answered in this guide, just give me a call or contact me through my website and I’ll be glad to help.
Sincerely,
Alan Bernau Jr.
1-800-488-6903
https://alansfactoryoutlet.com/contact-us/
Build your Own Metal Garage or Carport With Our 3D Builder
CHAPTER 1
Is a Metal Garage Right for You?
Considering adding a garage to your house? Here’s a quick checklist to help you determine whether a prefabricated metal garage is your best option or not.
A metal garage is right for you if…
You have vehicles and equipment you want to protect
A garage of any type will help protect your vehicles from damage caused by the sun’s UV rays, wind, rain, snow, ice, and hail. Unlike a temporary garage, a metal garage can be securely locked to protect your vehicles and equipment from theft.
You have a limited budget
Prefabricated metal garages are significantly less expensive than garages constructed with wood, concrete, and other materials.
You want a low-maintenance garage
Steel garages last a long time and require very little maintenance. They don’t rot, mold, or need to be repainted.
You want to increase the value of your home
Adding an attractive metal garage to your house can make your property more appealing to potential buyers and increase the resale value of your home. The value of a garage area is usually at least a quarter of the value of your house (per square foot). So if your house is worth $200 per square foot, your new garage will probably be worth at least $50 per square foot–but it will cost much less than that to install, so often you will get a 100% return on your investment.
You don’t want to fuss with a complicated and potentially expensive do-it-yourself project
Building a garage yourself might seem like it would be cheaper than buying a prefabricated garage. But because manufacturers get volume discounts on materials and already have all the tools they need, buying a prefabricated garage often ends up cheaper than building one yourself.
A metal garage is not right for you if…
Your budget is under $5,000
A basic, one-car garage installed on an existing concrete slab will generally cost at least $4,500. A two-car garage starts at about $6,500. If those prices are beyond your budget, you should consider a metal carport. Carports are about one-third the cost of a garage. If you need a carport, be sure to look for Alan’s Ultimate Carport Buyer’s Guide on my website.
You need a garage tomorrow
Regardless of how you go about it, building a garage on your property will take time. In most cases you’ll need to get a permit, prepare the site, have a concrete slab poured, and then schedule an installation. Metal garage manufacturers have lead times that can run from a few weeks to several months. If you need a temporary garage ASAP, your best bet is to pick up a portable garage kit from a local home improvement store. Generally these will have a metal frame that is covered by heavy-duty plastic and anchored to the ground. Since these are temporary structures, they usually don’t require a permit. You and a couple friends could set it up in a day.
You want an attached garage
Most prefab metal garages will be installed as a detached outbuilding. The garage installers will need about three feet of space on every side of the garage in order to set it up, and local building codes may require even more space between buildings. If you want an attached garage, you’ll probably need multiple permits and inspections, and you’ll probably want to hire a contractor to design and build a custom attached garage for your house.
You want to build an apartment in your garage
Metal garages are great for storing cars and things, but they don’t make ideal living quarters. If you’re planning on building an apartment in or above your garage, a stick-built garage is probably a better way to go.
You belong to a homeowners association that doesn’t allow detached garages
If your property is subject to HOA rules or other restrictive covenants, you’ll need to check what is allowed in your community before considering a detached garage.
What did you find? Does a detached metal garage fit your needs? In the next chapter you’ll learn how to size your garage and get an initial estimate of how much your garage will cost.
CHAPTER 2
How to Plan and Size Your Garage
Now it’s time to figure out what size of garage you need and approximately how much it will cost.
The size of your garage will affect two costs:
- The cost of the garage (which includes the installation cost)
- The cost of your foundation
Most garages are installed on a concrete slab. If you don’t have a concrete slab yet, don’t worry. I’ll explain everything you need to know about garage foundations later in this guide. For now I’ll just include the average cost of a concrete slab in the chart to help you figure out the approximate size of garage you can afford.
Use the following chart to get an idea of what size of garage is right for you.
| Size | Dimensions (ft) | Garage Cost | Concrete Slab | Area |
|---|---|---|---|---|
| Small one-car garage | 12×20 | $4,500+ | $2,000+ | 240 sq. ft. |
| Large one-car garage with workspace | 18×25 | $5,500+ | $4,000+ | 450 sq. ft. |
| Small two-car garage | 20×20 | $6,500+ | $3,500+ | 400 sq. ft. |
| Large two-car garage | 24×25 | $8,000+ | $5,000+ | 600 sq. ft. |
| Large two-car garage with workspace | 24×30 | $9,000+ | $6,000+ | 720 sq. ft. |
| Three-car garage (doors on the side) | 24×30 | $10,000+ | $6,000+ | 720 sq. ft. |
| Two bay, four-car garage | 24×40 | $11,500+ | $8,000+ | 960 sq. ft. |
Planning a Custom Garage
If you want to calculate the exact dimensions that are ideal for your situation, you may want to sketch a floor plan. This sketch will give you a better idea of how your vehicles will fit into your garage, and how much storage space or workspace will be left over.
Here is a sample sketch of a two-car garage.
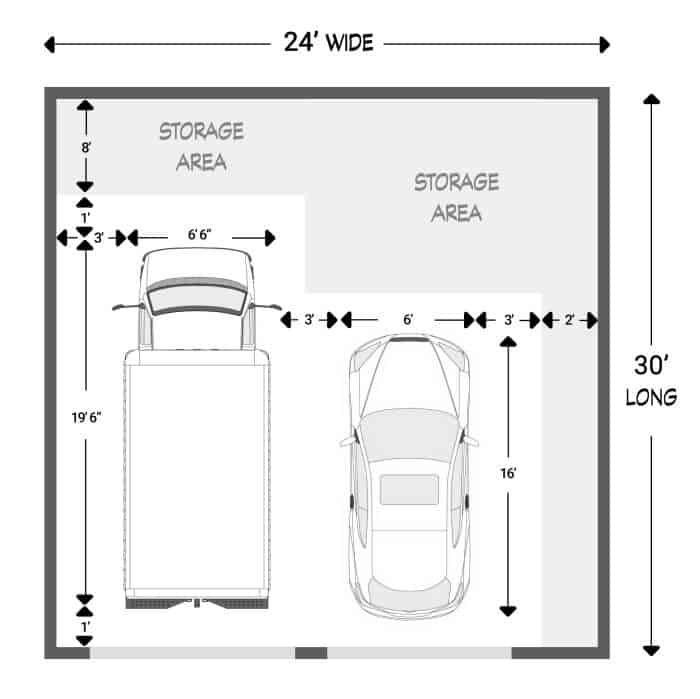
If you decide to draw a sketch, keep in mind that the inside dimensions of your garage will be about a half-foot smaller than the outside dimensions (the 14 gauge framing that is commonly used to build metal garages is 2 ½ inches wide).
Step 1 – Measure Your Vehicles
Here are three easy ways to measure your vehicles:
- Use a tape measure (this is easiest with two people), or
- Estimate by stretching out both arms next to your car (the length between the tips of your fingers is about the same as your height), or
- Use the vehicle size chart below
| Vehicle Type | Width* | Length | Height |
|---|---|---|---|
| Sports Car | 5 ½-6 ½ feet | 13-16 feet | 4-4 ½ feet |
| Compact Car | 6 feet | 14-15 feet | 5 feet |
| Mid-Size Car | 6 feet | 15-16 feet | 5 feet |
| Full-Size Car | 6 feet | 16-17 feet | 5 feet |
| Minivan or SUV | 6 ½ feet | 16-17 feet | 5 ½-6 ½ feet |
| Full-Size Truck | 6 ½ feet | 17-22 feet | 6 ½ feet |
| Class A RV | 8 ½ feet | 29-45 feet | 12-14 ½ feet |
| Class B Camper Van | 8 feet | 17-23 feet | 9-11 feet |
| Class C RV | 8-8 ½ feet | 21-41 feet | 10-12 feet |
* Widths do not include the width of rear-view mirrors.
Step 2 – Calculate Your Garage Width
Start with the widths of your vehicles, then add at least three feet of space between each wall and your vehicles, so you have enough space to open doors. You will also want at least three feet of space between each vehicle.
If you want extra space for storage on one side of your garage, add that to your total width.
Finally, add two and a half inches (about ¼’) to each side to account for the width of the two sides.
Example: 2 ½” frame + 3’ space + 6 ½’ truck + 3’ space + 6’ car + 3’ space + 2’ storage + 2 ½” frame = 24’ wide
Step 3 – Calculate Your Garage Depth
To calculate the depth you need, add at least one foot to each end of your longest vehicle, and then add any extra space you want for storage or a work area.
Example: 1’ space + 19 ½’ truck + 1’ space + 8’ work area + ½’ frame = 30’ deep
If your width and depth are both more than 30 feet, you may want to adjust your design to that at least one dimension is 30 feet or less. This will help keep the cost to manufacture your garage reasonable. If you need a garage that is 32’x32’, that’s fine–it will just cost a lot more than a 30’x35’ garage because a lot more metal is needed to support the roof.
That’s all!
In the chapter I’ll show you how to use an online garage designer to design and price your garage.
Build your Own Metal Garage or Carport With Our 3D Builder
CHAPTER 3
Design and Price Your Garage
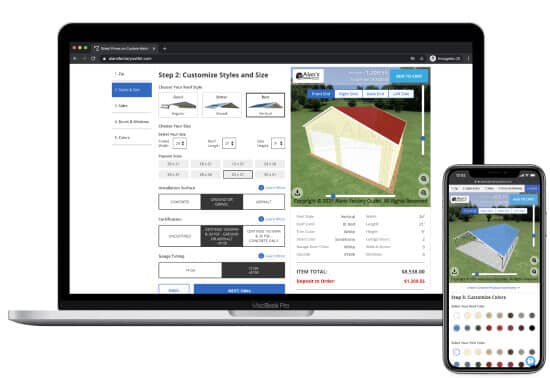
Now you are ready for the fun part: creating a 3D design of your new garage!
I have created a free 3D garage designer tool to make this part easy. But there is one thing I should mention before you get started. When you are using the garage designer, you will see a lot of options for customizing your garage. It is easy to get a little overwhelmed by all of these options, so in this guide I’ll give you recommendations to help you make the best decision for your situation. So keep this guide handy while you use the designer.
If you have a computer, you’ll want to use it for creating your design (the designer will work fine on your smartphone, but it is easier to use on a large screen).
Step 1A – Open the 3D Metal Garage Builder
On your computer, go to:
https://alansfactoryoutlet.com/3d-carport-and-metal-garage-builder/?type=garage
Step 1B – Select Your Dimensions
First, select the width and height of your garage. Use the measurements you calculated in chapter 2 of this guide.
Important tip: Because of the way metal garages are manufactured, it is much cheaper to make a long, narrow garage than it is to make a short, wide garage. So if you want a garage that is wider than it is deep, you should swap your length and width and put your garage doors on the side.
For example, let’s say you want a garage that is 34’x24’. If you swap the length and width and make it 24’x35’, it will reduce the cost of your garage by almost 50%.
Note: If you need custom dimensions that aren’t available in the designer, just use the next larger available size. We can match your custom dimensions, but the cost will be the same as the next larger, standard size.
For the side height, nine feet is best for most garages.
If you want a wide, two-car garage door, you will need to make the sides 10 feet tall. For an RV garage, your garage door should be at least six inches taller than your RV, and your side height should be two feet taller than your tallest garage door.
Step 1C – Choose Your Roof Style
The vertical roof style is best for most customers. If you aren’t tight on budget, just select a vertical roof and continue.
If your budget is tight, a standard roof style is the least expensive option. The boxed-eave style is comparable to the standard roof style, but has a nicer appearance.
Some reasons to choose the vertical roof style:
- It is the strongest roof option
- The vertical panels allow all rain to run off immediately and make it easier for snow to slide off
- A vertical roof is necessary for garages more than 30 feet wide or more than 35 feet long
Step 1D – Other Options
Installation Surface: We’ll cover this in the next part of the guide. For now, just select concrete.
Certification/Tubing: If you live in an area with hurricanes, strong windstorms, or lots of snow, you may want to select the heavier, 12 gauge tubing and upgrade your certification (if available).
Step 2 – Sides
If your garage is getting too expensive, you can remove the ends and sides and turn your garage into a carport. Otherwise, just skip this step.
Step 3A – Garage Doors
I recommend adding separate garage doors for each vehicle, because two smaller garage doors are less expensive than a double garage door. Smaller garage doors are also easier to open and close.
Most people will want to use 9’x8’ doors, but if you have a wide truck with large mirrors, the wider 10’x8’ doors are better.
If you don’t have any large vehicles and you’re designing a two-car garage that is only 20 feet wide, then you’ll need to use two 8’x8’ doors or a double-wide 16’x8’ door.
For an RV or other oversized vehicle, you’ll need to measure your vehicle to determine the best door size. All of the garage doors hang down a little from the opening, so you should make sure your garage door is at least six inches taller than your vehicle.
The garage doors in the 3D designer are manual, roll-up style doors. If you need an automatic door, you can add a rolling door opener to your garage later. Another option is to leave off the garage door, request a framed opening instead, and have a garage door company put in an automatic door after your garage is installed.
Step 3B – Doors and Windows
Most of my customers add one walk-in door and one or two windows. Others prefer no windows, so this is really up to your preference.
Step 4 – Colors
The colors you choose don’t affect your price, so this is a matter of preference. Many people like white trim and white garage doors. Others match the color of the trim or garage door to the color of the sides or roof.
Step 5 – Save Your Design
Now that you have finished your design, you should be sure to save it. Find the button that says “Share” or “Save,” click it, and enter your email address to get a link to the design.
Also be sure to note the price of your design. If you’re satisfied with your design and want to lock in your price right now, you can pay a deposit to hold the order, even if you aren’t quite ready to proceed yet. My company guarantees a 100% refund of your deposit if you cancel for any reason, so if you know you want a metal garage, there isn’t any risk to making the order now.
In the next chapter I’ll tell you how to find your local planning department and I’ll give you a list of everything you need to ask about local rules and regulations.
CHAPTER 4
What You Need to Know About Regulations and Permits
Before you build a garage, you will almost certainly need to get a permit from the local government. Permits can be a hassle, but they’re required for a good reason. Each area has different soil conditions and weather patterns that need to be considered when building a garage. Local regulations are designed to help you build a garage that is safe in local conditions.
If you are working with a reputable contractor, they will require you to get a permit before they install your garage. A contractor who skips the permit process might also cut corners while building your garage.
Step 1 – Check CC&Rs
Before you contact the local government, you should find out if your local community has any restrictions. If your property is part of a subdivision, it may be subject to Covenants, Conditions, and Restrictions (CC&Rs) that contain rules about what can and cannot be built on your land.
If you are part of a Homeowners Association (HOA), ask about restrictions on detached garages.
If you aren’t part of an HOA, you can look through that stack of papers you signed when you bought your property and see if there are CC&Rs that limit what you can build on your property.
Step 2 – Check Government Regulations
Your local planning department can tell you the general building rules that apply to your property.
You might be able to find all the rules online by yourself, but it will probably take several hours to find the proper ordinances and read through hundreds of pages of zoning and building codes written in legal jargon.
It is much faster just to call the planning department and ask the specific questions that I’ll give to you below.
Before you call, you should have this information ready:
- Your address
- The length and width of your future garage
- An idea for where you want to put your garage
Now you need to find the right phone number to call. If you live in a town or city, do an internet search for your town or city’s planning department. If you live outside of a town, search for the county’s planning department. The local planning department may be called a “zoning department,” “land use and development,” “building and planning,” or something similar.
For example, I did a search for “page county va planning department,” and I found results for a “Planning Commission,” “Planning & Community Development,” and a “Zoning Office.” The phone number was the same for all of them. Even if you call the wrong number, the person who answers the phone will probably be able to give you the right number to call.
List of Questions to Ask (Be Sure to Take Notes!)
- Is my property in your jurisdiction?
- How far does the garage need to be from the front, back, and sides of the property?
- How far away does the garage need to be from the house?
- (If you plan to put it in front of your house) Can I put it in front of my house?
- (If you have a well or septic tank) How far does the garage need to be from the well and septic areas?
- (If you are building a tall garage) Is there a height limit?
- Are there any color or style restrictions for detached garages?
- What permits and inspections are required for installing a detached metal garage?
- What department is responsible for issuing permits? (If it is a different department, ask for the phone number)
Here are the questions to ask the department that issues building permits:
- Is there an online application?
- How long does it take to get a permit?
- Are certified plans required for the permit?
- What are the requirements for the foundation?
- Does the area around the building need to be graded? How much?
- Are there any wind gust or snow load certification requirements?
- How much does the permit cost?
If you plan to use your garage for a workshop or business purposes, you should also verify these uses are permitted.
Done?
Great job. Make sure you have written down everything you found out. There are a few more steps you’ll need to complete before you’ll be ready to apply for a permit. In the next chapter I’ll show you how to use the information you have gathered so far to plan your site.
Build your Own Metal Garage or Carport With Our 3D Builder
CHAPTER 5
Planning Your Garage Site
In the last step you found out all of the required setbacks from your local planning and zoning department. Now it is time to make a site plan. Grab a tape measure and head outside to the spot you want to put your garage.
Step 1 – Find a Level Spot
The foundation for your garage will need to be completely level. Level isn’t the same as flat. Level means the ground doesn’t slope.
You need to find a location that is already pretty level, or find an area that you can make level. In addition to a level area for the garage itself, you will need at least three feet of fairly level ground all around the building where the installation crew can safely place their ladders.
Your local building codes may require the ground around your garage to be graded so that it slopes away from the building. They will probably want the ground where your garage will be installed to be about six inches higher than the ground 10 feet away from the building (check the notes you took when you called the building code department to find your local requirements). A slight slope helps ensure that water flows away from the garage so that it won’t harm the foundation.
Even if your site isn’t perfectly level, your concrete contractor can probably take care of the necessary grading. Excavation and grading will cost money, so it is best to pick a spot that is fairly level to start with.
Step 2 – Look Overhead
Utility lines near the area you want the garage can be a safety hazard when installing a metal garage. Find a location that doesn’t have any utility lines overhead or within 20 feet of the site. If you want to put your garage anywhere near overhead lines, please give me a call to discuss your site before continuing.
The peak of an average-size metal garage will be about three or four feet higher than the height of the legs. If there are any trees with limbs that extend over the garage area, these should be trimmed to provide plenty of clearance to install the garage.
Step 3 – Mark Your Corners and Check Setbacks
Now you can mark four corners of your garage with stakes, sticks, or flags.
If your garage site is near any property lines, your house, outbuildings, a well, or a septic field, measure the distance to each of these, and make sure that the garage will be far enough away from all these objects and boundaries.
Be especially careful about setbacks from property lines. Often fences are not right on the property line. You may need to leave an extra foot of space from a fence, just to be safe. If you want to put your garage near a road, you’ll want to double-check where the property line is. Often the public right-of-way is much wider than the road, and your property line might be 10 feet or more away from the road or sidewalk (your local planning department should be able to tell you how wide the right-of-way is).
Step 4 – Check Underground
If you have any easements on your property, you’re probably not allowed to build a garage above those areas.
If you’ll be doing any grading or excavation, you’ll also need to check what is underground before you do any digging. Anywhere in the US you can call 811 or visit call811.com to request all underground utilities around the site to be marked.
If there are any utilities in the area around your building site, you may need to move your site or discuss other options with a concrete contractor.
CHAPTER 6
Planning and Pricing Your Foundation
Jesus said that a wise man builds his house on a rock. Likewise, a wise homeowner builds his garage on a concrete slab.
If your local building department allows it, you can have a metal garage installed directly on the ground or on a gravel foundation (the installers can securely anchor the garage to the ground with rebar anchors or mobile home anchors). A dirt or gravel foundation might be fine for storing farm or garden equipment, but if you’re planning on using your garage for your vehicles, concrete is the way to go.
On my website, you might see the option to install on an asphalt foundation. That option is for carports. Because asphalt gives off a chemical smell, it isn’t suitable for an enclosed garage that isn’t well ventilated.
Your foundation will be the second largest part of your total cost. If you’re afraid the cost of your foundation will make your garage unaffordable, I have included some do-it-yourself tips at the end of this chapter.
Have an Existing Foundation?
If you have an existing foundation, you might be able to use it for your new garage. Check with your local building department to verify that it meets local building codes. If you’re ordering a garage from Alan’s Factory Outlet, the foundation should be at least a foot wider and a foot longer than the dimensions of your garage. The existing foundation should also be at least four inches thick. This will allow the garage to be securely bolted to your foundation.
Specs for Pricing a New Slab
In order to get accurate quotes for your foundation, you’ll need to know a few details about garage foundations so you can ask the right questions. Having some knowledge about foundations will also help you recognize whether the contractor you’re speaking with is an amateur or a pro.
Thickness. A four-inch-thick concrete slab is suitable for most garage foundations, but local codes may require a thicker slab. If you need to park unusually heavy vehicles in your garage (like an RV), then your foundation should be six inches thick.
If you will be using heavy-duty floor jacks to lift vehicles in your garage, you may need additional support in the areas you will place the jacks. Discuss your specific load requirements with a concrete contractor.
Footings. The concrete around the edges of your slab will need to be thicker than the rest of the pad in order to form a footing that will support the garage walls. Typically local codes will require a footing that is at least 12 inches deep and 12 inches wide. Deeper footings may be required in your area if you have a lower frost line or other adverse conditions.
Slope. Your slab should be completely level. A level foundation will allow the building to be properly installed and all of the doors to open and close properly. It also provides a nice, level work surface, and it is the cheapest type of slab to pour.
If you’re wondering why attached garages have a few inches of slope from back to front, the reason is to allow water to run out the garage. An attached garage will often have a water heater and a washing machine that need to be drained for repair, so this is important. But for a detached metal garage, a level floor is better. If you want to wash out your garage occasionally, you can use a squeegee to sweep excess water out of the garage.
Size. Most of the metal buildings that I sell require a concrete slab that is one foot wider and one foot longer than the base of the garage. This ensures that the heavy-duty concrete bolts that anchor the garage to the ground won’t crack the concrete near the edges of the pad.
However, some of the garages I sell require a concrete pad that is the exact size of the base of the building. So I created a concrete pad size calculator that you can use to easily determine the right size of slab for a garage in your specific location.
Edges. If your concrete pad is larger than the base of your garage, there will be a small concrete ledge all around the edges of your garage. If this ledge is level with the rest of the foundation, water running down the outside walls of the garage will tend to pool around your garage and seep in under the bottom rail of the frame. To prevent this, you can slope this ledge, so the outside edge is ¾” lower than the top of the slab. Or you can lower the whole ledge by ¾”.
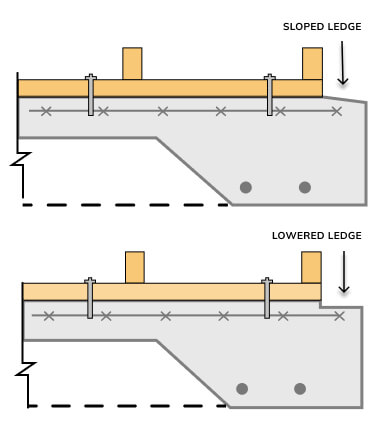
The person who builds the frame for pouring your slab can form a sloped or lowered ledge by placing six-inch boards inside the form boards, ¾” of an inch lower than where the top of the slab will be. If you decide to leave the ledges at the same level as the rest of the slab, you should apply a concrete sealant around the base rail of your garage after it is installed to prevent water from seeping into the garage.
Gravel. Compacted gravel provides a stable, level base for a concrete slab. It also helps prevent moisture in the ground from seeping into your foundation. I recommend putting down gravel before you pour a slab, but it may not be required in your area.
Vapor Barrier. Most contractors will place a thin vapor barrier on top of the gravel (or dirt), and will pour the concrete on top of this vapor barrier. The vapor barrier serves two purposes. First, it can help ensure a stronger slab by preventing water in the concrete from draining into the gravel while the concrete is curing.
The second purpose of the vapor barrier is to reduce the amount of water that can seep up from the ground, through the porous concrete slab, and into your garage. Ground moisture is especially a concern if you won’t have any gravel under your concrete slab.
Apron. You will probably need a concrete apron in front of your garage to serve as a ramp up to the top of the slab, which should be a few inches above ground level. If you also want a driveway, now is the time to figure out how large you want it to be.
Get Quotes
The easiest way to find a good concrete contractor is to call the nearest Ready Mix supplier. Talk to the concrete dispatcher and ask for the names of the best two or three concrete slab contractors in the area. The dispatchers usually know who does good work since they deliver concrete to everyone.
If you can’t get good recommendations from a concrete supplier, just do an internet search for “concrete contractor near me.” In the search results you’ll find lots of “middleman” sites like HomeAdvisor, Angi, Thumbtack, and Handy. These sites will offer to give you quotes from local professionals if you fill out a form on their website. What you may not realize is that most of these sites will sell your contact information to several contractors. Each contractor has to pay expensive fees that can run over a hundred dollars, just to call you. If these middleman sites show you a list of local companies, just look up each company online to find their website or phone number.
When you call each contractor, here is a list of talking points:
- Ask if they pour foundations for detached metal garages.
- Ask them how many garage and carport foundations they do a year.
- Explain your project and ask for their recommendations.
- Ask if they recommend gravel or a vapor barrier.
- Ask how they cure the concrete after it is poured.
- Get a quote. Make sure you know what is and is not included in the quote.
- For some recent references (homeowners who they poured a garage floor for).
Let each contractor talk enough for you to get a feel for whether they would be a good fit for your job or not. Take good notes, so you’ll know who to call back later when you’re ready to start.
Want to Do It Yourself?
The cost of labor is the biggest factor in the price of your garage foundation. If you can’t afford to hire a professional, you may be able to cut your cost in half by pouring the foundation yourself. But remember, the foundation is a critical part of your garage, and mistakes can be expensive.
If you have plenty of time available and are willing to learn, I recommend you do two things before you decide to pour your own foundation:
1. Calculate the cost of materials
Use a construction cost calculator to estimate the cost of materials you will need. You should add a generous buffer to your estimate for unexpected expenses.
2. Learn from a pro
It’s better to learn exactly what you need to do from a pro than to make expensive mistakes. There’s a guy named Mike Day who has an online concrete slab course for a reasonable price. It comes with a money-back guarantee, so if you take the course and decide that the job is more than you can handle, you can get a refund.
Build your Own Metal Garage or Carport With Our 3D Builder
CHAPTER 7
Get Financing and Submit Your Order
By now, you should have a pretty good idea about how much your garage will cost.
You know:
- The cost of the prefab garage you want, including installation
- The cost of permits
- The cost of a concrete foundation for your garage
Once you total those up, you’ll know the total cost of your project.
If you’ve got the cash you need to pay for everything, you just need to order your garage to get started. You only need to pay a deposit when you order, which is usually between 10% and 17% of the total. The balance isn’t due until after the garage is installed. You can pay both amounts with any major credit card.
If you need a way to finance your garage, here are some options:
Second Mortgage or Home Equity Line of Credit (HELOC). If you’ve been paying off your mortgage or your house is worth more than what you paid for it, you probably qualify for a second mortgage or a line of credit on your house. Like your primary mortgage, these types of loans are secured by the value of your home. As a result, the interest rate is usually very reasonable.
A second mortgage is good for a one-time purchase. A HELOC is a line of credit that you can use again and again as needed. The line of credit will give you more flexibility for your project, and you can also use it for other large purchases or emergencies in the future. Some HELOCs are much more flexible than others, and rates vary, so it pays to shop around at local banks. If you don’t have enough income or equity to satisfy a bank, often a local credit union will consider lending to you.
The downside of these types of loans is the paperwork and waiting while everything gets set up.
Zero-Interest Card. If you know you’ll be able to pay off the total in less than two years, a zero-interest credit card may be an option. Some cards don’t charge interest for up to 21 months. But you’ll need to check the terms carefully, and you should make sure that your credit limit will be large enough to cover the necessary expenses.
Personal Loan. Many banks, credit unions, and peer-to-peer lending sites offer unsecured personal loans for large purchases. The interest rates are usually less than a credit card, but higher than a HELOC. You’ll also probably have to pay a one-time origination fee in addition to the interest, which adds to the total cost of the loan. A HELOC is usually a better choice than a personal loan–but you will probably be able to get a personal loan faster and with less hassle.
Cash-Out Refinance. If you have a high interest rate on your mortgage, a cash-out refinance could provide the funds you need for your garage and lower your interest rate. You might even be able to lower your mortgage payments. Remember that you’ll have to pay closing fees though, which can be expensive.
Submit Your Order
Once you have a financing plan, you’re ready to order. If you saved your design, find the email with the link to your design, and open your design in the online designer.
If you can’t find the design you saved, or you want to start over again, just head over to the 3D Garage Builder on my website:
https://alansfactoryoutlet.com/3d-carport-and-metal-garage-builder/?type=garage
Once you have everything the way you want it, submit your order and pay the deposit to lock in your price. Remember that when you place an order with Alan’s Factory Outlet, you can cancel for any reason and get your full deposit back.
After you submit your order, my team will send you information about requesting a permit and getting your site ready for installation. Then we will hold your order until your permit is issued and your site is ready. Once you have everything ready, we’ll notify the manufacturer, and your order will be put in a queue for scheduling.
If you need to make customizations to your design that aren’t possible with the 3D Garage Builder, just give me a call at 1-800-488-6903.
CHAPTER 8
Time to Get a Permit
Now it is time to request a permit.
Pull out the notes you took when you spoke to your local building department, and find the online or paper application form for a building permit. In your jurisdiction, this may be a permit for an “accessory structure,” or it may be a more general “residential building permit.”
A few local governments require the manufacturer to apply for (or pick up) a building permit. If this is the case in your area, please let us know.
Engineer Plans. If the building department requires a set of generic engineer plans to review, let us know ASAP. We will get the plans ordered, and the manufacturer will send them to you by email in 1-2 weeks. If your local government requires “wet seal” plans (a set of plans that have been physically stamped with a rubber seal), these will have to be mailed to you, and this will take longer.
Site Plan. Many building departments will require you to sketch a map of your property, showing the location of your proposed garage in relation to the boundaries of your property and other buildings, wells, and septic fields on your property.
Complete the application. Finish filling out the application and pay the fee.
Send us a copy or photo. Once you get the permit, send us a copy, so we’ll know you’ve completed this step.
Haven’t ordered your garage yet? Be sure to submit your order at https://alansfactoryoutlet.com/
Build your Own Metal Garage or Carport With Our 3D Builder
CHAPTER 9
Complete Site Prep and Foundation
Now it’s time to get the site for your future garage ready for installation.
Ground or Gravel Installation
If your garage will be installed directly on the ground or a gravel base, here is what you need to do:
(These instructions do not apply to a concrete foundation.)
- Mark the four corners where your garage will be installed with a flag or a stake.
- Make sure the length of each side is correct, and that the diagonal distance between two opposite corners is the same as the distance between the other two opposite corners.
- Use a level to make sure each side is level. If you only have a bubble level, you can also run a string between the corner stakes to help you make sure each side is completely level and that there aren’t any high or low spots.
- Make sure that there is at least three feet of space of clear, fairly level space on every side of the garage area, so the installation crew will have space to work.
- Take at least one photo from each of the four sides to show that the whole area is clear and level. When you take the photos, be sure to stand far enough back so the whole site is included in each photo.
Concrete Slab
After you order a metal garage, we’ll send you a set of specific recommendations and diagrams for your foundation. Share these recommendations and diagrams with your concrete contractor and get your slab installation scheduled.
The best time to pour concrete is when the weather will be above 50 degrees for a week. If the weather is too cold (below 40 degrees), the concrete can’t set and cure. So if you’re up north and it’s winter, you’ll probably have to wait for warmer weather.
Cure Your Slab
Be sure to ask your contractor for advice on the best way to cure your slab for maximum strength.
Curing is the result of a chemical process called hydration that occurs between the cement and water that are in the concrete mix. As the cement reacts with the water, it forms crystals that bind the aggregates in the concrete together. As this chemical reaction proceeds, the concrete becomes harder and stronger. Usually the concrete will “set” within 24 hours, at which point it is strong enough for a person to walk on without leaving footprints.
After the concrete has set, your slab will continue to harden for years, as long as water is present in the slab for the reaction to continue. However, most of the strengthening will occur in the first few weeks. After a month your slab will have almost reached its full strength.
Keep It Wet. In order for your concrete to reach its full strength, you must prevent too much moisture from escaping from the concrete while it is curing. You should do your best to keep your slab wet for at least one week after it is poured, as long as the outside temperature is above 50 degrees (when it is colder or very humid, there’s no need for more water). The easiest way to keep your foundation wet is to use a sprinkler with a fine mist setting. Just be careful not to spray so much water on your slab that the area around your foundation becomes flooded enough to compromise your foundation.
If the weather is reasonably warm, and you keep the surface moist, the concrete will probably reach about two-thirds of its potential strength in that first week. At this point you can drive on the slab if you need to. However, you might want to keep your slab wet for a few more weeks so the curing process will continue to strengthen your foundation.
If you don’t think you’ll be able to keep your slab wet for a week or more, your contractor may be able to lay a hassle-free curing blanket, like the UltraCure NCF curing blanket, that will keep your slab moist and warm while it cures. There are many other curing techniques as well, so ask your contractor for his recommendation.
Get Your Garage Installation Scheduled
Once your slab is in place, send us four photos of your site. Take one photo from each side, from a distance, so we can see that the site is ready and that there is at least three feet of fairly level ground on each side for the installation crew. Once we receive these photos (and a copy of your permit), your order will be put in a queue for scheduling.
Haven’t ordered your garage yet? Be sure to submit your order at https://alansfactoryoutlet.com/
CHAPTER 10
While You Wait
Waiting for your garage to be installed can seem like the hardest part of your whole garage buying journey.
This is how the scheduling process works:
- You get a permit and prepare the site.
- You let us know you are ready for installation.
- Your job is put into a queue of orders.
- When there are enough orders for a job route to be scheduled in your area, you’ll get a call to let you know which day your job is scheduled to be installed.
Unfortunately, this means that you won’t know which day your garage will be installed until a few days in advance.
Also, since your installation will be part of a multiple-day route, if the installation crew runs into problems with a building they are installing before yours, they’ll need to call you to push the installation time back. They may even need to reschedule your installation for the next route. Hopefully this inconvenient situation won’t happen to you, but I trust you understand the challenges that the installers sometimes face.
In addition to a normal variability in delivery times, right now several factors can cause additional delays:
- High lumber prices have led to greater demand for metal garages.
- Installation crews have been shorthanded.
- There have been unpredictable supply-chain delays.
Depending on the size and location of your order, it can take anywhere from a few weeks to several months for your garage to arrive. On my website’s home page you can find estimated delivery times for your area. In a few cases, the wait time is much longer than expected, but most orders are delivered within the estimated time frames.
I know it can be frustrating to wait for your garage when you don’t know exactly when it will be delivered. If the wait time for your installation doesn’t work out for you, you can always get a full refund of your deposit. But a little patience will pay off, and soon you’ll have the beautiful, high-quality garage you’ve always wanted.
Once your garage has been installed, please send me some photos or a video! Every month I give a $250 Amazon gift card to one person who has shared a photo that month, and a $500 gift card for someone who has sent in a video. I’d love to see how your garage looks once it’s installed and put to good use.
Haven’t ordered your garage yet? Be sure to submit your order at https://alansfactoryoutlet.com/
Build your Own Metal Garage or Carport With Our 3D Builder
Final Thoughts
I hope this guide has been helpful as you research and plan your garage. If you happen to have any questions that I didn’t answer in this guide, give me a call or contact me through my website, and I’ll be glad to help.
I wish you all the best in your garage buying journey!
Thank you,
Alan Bernau Jr.
1-800-488-6903
https://alansfactoryoutlet.com/contact-us/